|
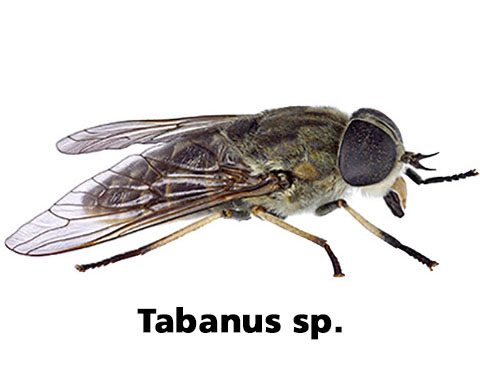
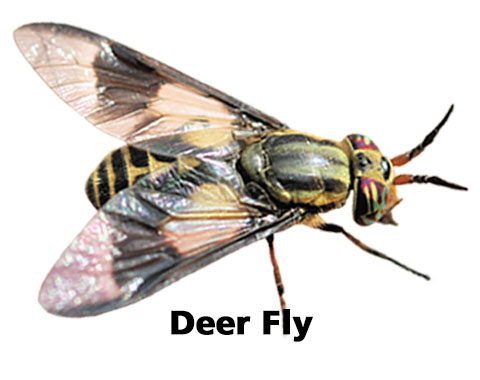
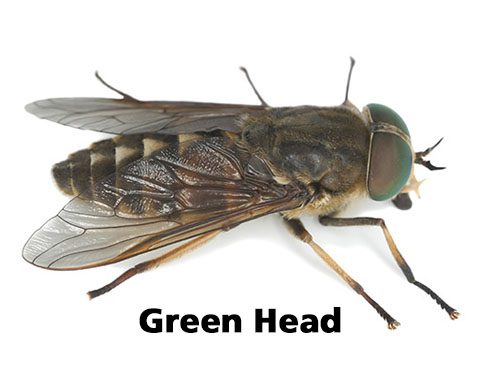
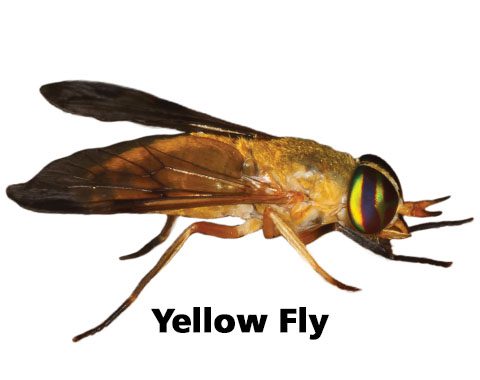
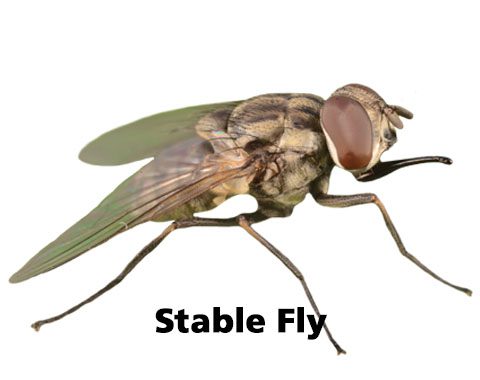
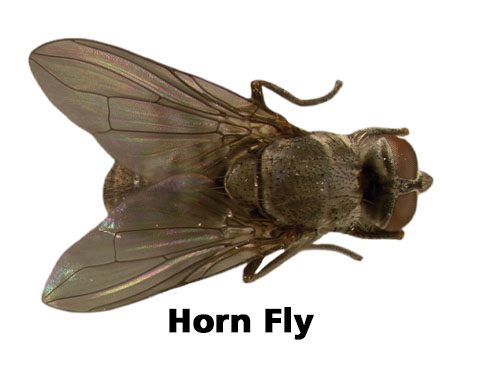
The H-Trap Professional Horse Fly Control System Please read this manual carefully before setting up and using your unit! BEFORE ASSEMBLING your horse fly trap, please be aware that not all flies that bite your horses and family are horse flies. The H-Trap is specifically designed to catch flies from the Tabanidae family only; these include horse flies, also known as greenheads, yellow flies, deer flies, and those large black “B-52 bombers.” (See Figure 5 for identification.) The H-Trap will NOT catch other biting flies that bother horses, such as stable flies and horn flies (from the Muscidae family); these are smaller than a typical tabanid (horse fly), but also can help carry vector borne diseases like a horse fly. Consider these other distinguishing features at a glance: Horse fly eggs and larvae are found in wet, swampy areas. Stable fly and horn fly eggs and larvae are found in fecal matter, urine soaked bedding, or in the wet, decomposing straw found around hay bales. Another difference is the way these types of flies bite. Signs of horse fly bites are trails of blood from the wound that the horse fly leaves after cutting the skin and pumping in a substance that allows the blood to flow. Stable fly and horn fly bites tend to be less bloody, with much smaller ‘dots’ of blood left after feeding. Please also see Section I about meeting expectations. The manufacturer reserves the right to change the construction and/or configuration of the product at any time without obligation to modify earlier versions of the product. |
 |
A) Receipt of the H-Trap:
Please verify that you have tabanids (horse flies) before unpacking and installing your horse fly trap unit. (If you have ANY uncertainties after reviewing Figure 5 in this manual and would like us to help you identify the flies on your property, please contact us by using the information provided on the back of this manual.)
While unpacking your unit, please check for any signs of shipment damage. If found, notify both the shipping carrier andsupplier in writing within eight (8) days after receipt, listing full details of any damage that has occurred. Retain the equipment and packing materials for inspection and/or returns. Check that you have received all parts identified in Figure 1. Remove all packing materials before use.
B) Required assembly tools:
- Hammer
- Wrench (a hand tool is provided, but you may wish to use your own adjustable wrench for easier installation.)
- Pump (a hand pump is provided, but you may wish to use your own equipment such as a compressed air unit or an electric pump for ease in installation).
- Steel rod or equivalent to test ground before installation of base pipe. See Figure 4.
C) Placement options:
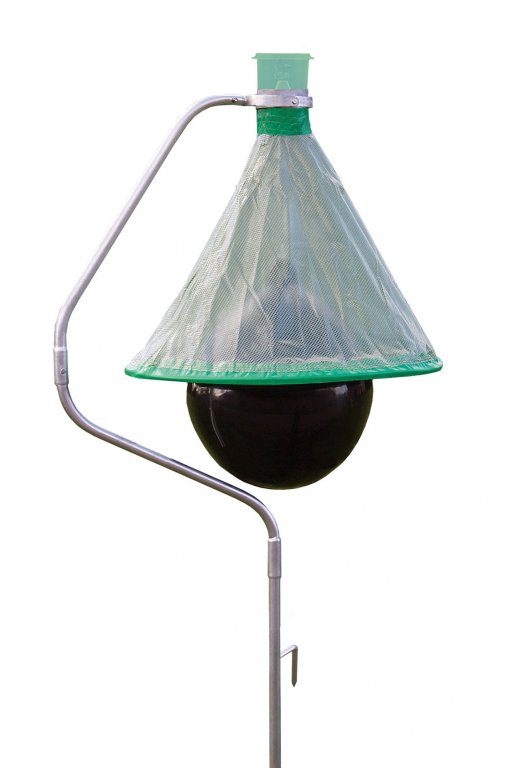
You can install the H-Trap in the ground with the three piece frame that comes with the unit or against a wall or pole with a bracket (not supplied) in the vicinity where animals rest and feed and where humans congregate. Horses are especially curious animals and may want to nibble at the plastic hood if placed directly in their enclosures. Avoid this situation by placing the horse fly trap just outside fenced in areas or by erecting a barrier within the paddock. If affixing the unit to a wall or fence, have the ball sit at the height it normally would when using the base pipe (about 9” from the ground).
D) Optimum placement:
- To maximize your catches of horse flies, identify their likely flight paths, usually from damp or wet areas such as ponds, river banks, and boggy areas where larvae will develop and emerge. (Adults typically emerge from their breeding sites in one to three years.)
- Position your horse fly trap close to where humans and animals congregate. If you are not catching horse flies, and you are certain the flies you have are actually horse flies, reposition the trap. Often times trial and error will be the key to a successful location.
- Determine if more than one horse fly trap is required for coverage depending on the horse fly population present and the number of humans and/or animals needing protection. One horse fly trap will cover 5 horses or about 2.5 acres.
- Set out your horse fly trap(s) just before the first adult horse flies emerge in your area.
- To move the H-Trap to alternative locations, unbolt the base pipe (1) from the middle pipe (2) and the rest of the attached unit. This will allow you to more easily pull up the base pipe without damaging the ground anchor and frame.
E) Installation Instructions:
(See “Figure 1: Exploded view” as a reference to the part numbers in this section.)
- First consider where horse flies are breeding and emerging as adults on your property (usually wet, swampy areas). The H-Trap must be located in a hot, sunny location.
- Mark the spot in the ground where you want to place the unit. Pre-test the area for rocky soil by using a steel rod or similar rod to make a pilot hole. (See Figure 4.)
- Once the base pipe (1) is firmly set at your desired location, use a hammer to drive the frame into the ground until the anti-rotation anchor is completely under the soil. (See Figures 2 and 4.)
- Once the anchor part of the frame (1) is in the ground, you can either build the remaining portion of the trap on the ground or in place. If you choose the latter method, which is our recommendation, save Step No. 5 below until the end of assembly and have a partner help you lift the remaining frame and parts onto the anchor pipe in order to finish the installation.
- Mount the middle pipe (2) onto the base pipe (1), using the long bolt (4), the washer (6), and nut for the long bolt (5). (The bolt goes through the pipe first; the washer follows, and the nut is placed last and tightened with a wrench.)
- Mount the top pipe (3) onto the middle pipe (2) by inserting the long bolt (4) into the pipe, adding the washer (6) next and then the nut (5) to tighten around the long bolt. (This step and the following steps can be done on the ground. See No. 4 above.)
- Mount the bracket (7) into the top pipe (3), inserting the long bolt (4) into the pipe and adding the washer (6) next, and then the nut (5) to tighten around the long bolt. (Note: The stabilizing ring (8) and bracket (7) usually come pre connected.)
- Next connect the metal holder (11) to the stabilizing ring (8) by unscrewing and using the two smaller M8 bolts (17) attached to the metal holder (11).
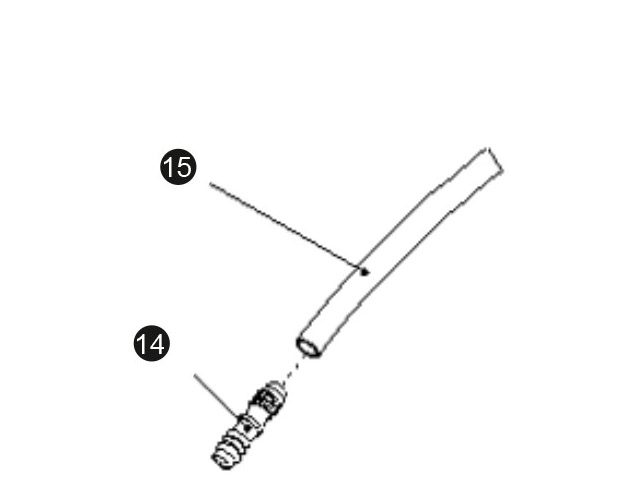
- Before attaching the green conical hood/ funnel (10) to the metal holder (11), the plastic pipe connectors (14) and funnel reinforcement pipes (15) need to be inserted into the hole at the bottom skirt of the funnel one section at a time. See Figure 3. The final connection will be made when all three pipes and connectors have been secured. Note: Having another person on hand to help you feed the reinforcement pipes and connectors through the skirt of the funnel is helpful. Applying a very small amount of food oil onto a cloth and wiping each section of the piping beforehand will also help slide these plastic parts through more easily.
- Place the funnel (10) onto the metal holder (11) by means of the Velcro band (12).
- Inflate the ball (9) using a compressed air unit, an electric pump for an airbed, or the pump included in the box. The diameter of the ball should be inflated approximately 22 inches in diameter. Put in the white plastic plug after inflating the ball.
- Lift up the funnel (10) to mount the ball (9) on the metal holder (11) using the ball hook (13). Attach the L shaped end of the ball hook (13) to the ball. The curved end of the ball hook attaches to the hole in the metal holder (11).
- If you have assembled the trap on the ground, now connect the base pipe (1) to the middle pipe (2). See No. 5 above.
- Set the collection bin (16) onto the holder (11). Make sure that the lid locks into the bin.
Your H-Trap is now ready for use and catching horse flies!
F) Key features:
- Galvanized, corrosion proof steel construction.
- Weather-proof design.
- Easy and fast installation.
- Single leg for easy grounds keeping.
- Enviormentally friendly.
- Ergonomic design, allows easy handling of the trap.
- Effective and easy control of horse flies.
- 2 year warranty on manufacturer’s defects.*
[*Disclaimer: The two year warranty period does not cover damage due to extreme weather conditions, including but not limited to high winds, hurricanes, and storms. We advise if these weather conditions are anticipated, bring the ball, collection bin, and funnel assembly indoors until good weather prevails.]
G) Periodic maintenance:
- The collection bin of the horse fly trap needs to be checked, emptied, and cleaned regularly (fill with water if necessary). We recommend maintenance at least once a week, depending on your horse fly catches. Make sure that the lid is relocked in place.
- Make sure that the ball stays inflated.
- While the top bracket of the H-Trap has been designed to move with the wind, unusual storms and high winds may have an impact on the stability of the H-Trap. Check the framework periodically and after storms.
- The plug in the ball can be removed with the white plastic plug tool that is included.
- The inflated ball and hood can be removed from the unit by unclipping the ball hook.
H) Key specifications:
Dimensions : 3.9 ft. wide x 6.4 ft. high
Frame : corrosion proof steel dipped in hot zinc, under 1/8th in. thick
Net Weight : 30 lbs.
Materials/Color : black inflatable ball, green UV proof plastic funnel and bin
Tools Included : manual ball pump, ball plug, ball plug clip, and wrench
Packing box : 12.2 in. high x 43.3 in. long x 8.3 in. high
I) Meeting expectations:
Some of you may begin catching horse flies almost immediately after installation of our horse fly trap. As a general rule, however, you should not expect a horse fly trap to eliminate horse flies in a short period of time. It may take weeks or more to collapse a population over time.
Horse flies have evolved to find (and bite!) horses and other mammals, including us. Any horse fly trap on the market is, at best, a close second choice for the female horse fly who is looking for a blood meal in order to reproduce and lay eggs. Therefore, as long as there are still horse flies in your environment, no horse fly trap will entirely prevent you or your animals from getting bitten.
Our goal is to give you the best experience possible in helping you to reduce the populations of horse flies (tabanids) at your property. Your reviews and feedback allow us to give you the best service and product improvements. No question is too small. Please contact us for assistance using the information on the back of this manual.
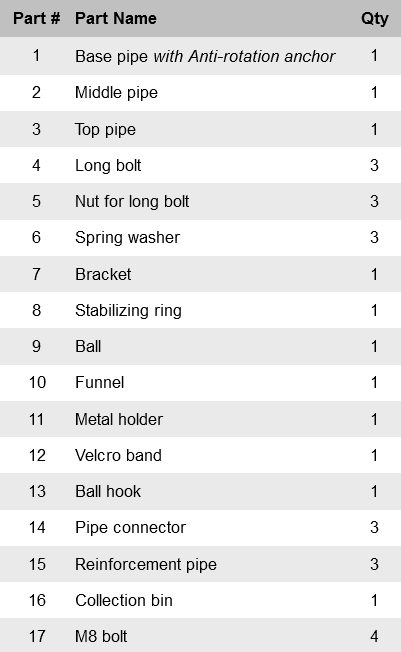
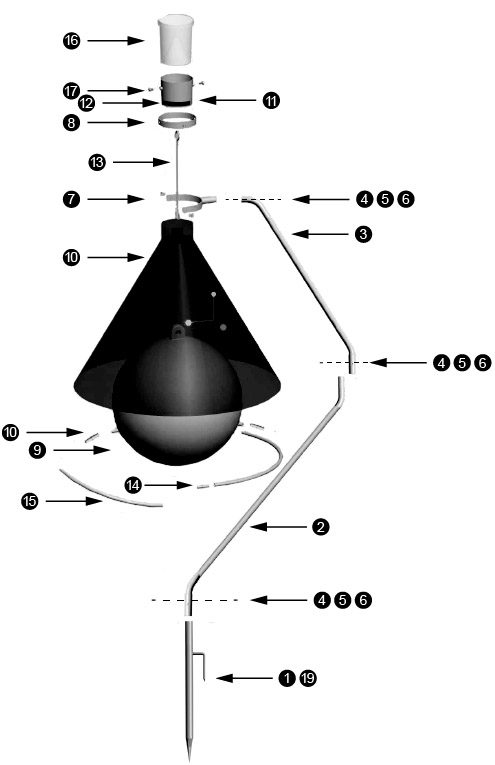
Figure 2: Hammer the base pipe (with Anti-rotation anchor) into the ground after testing the soil first. (See Figure 4.)
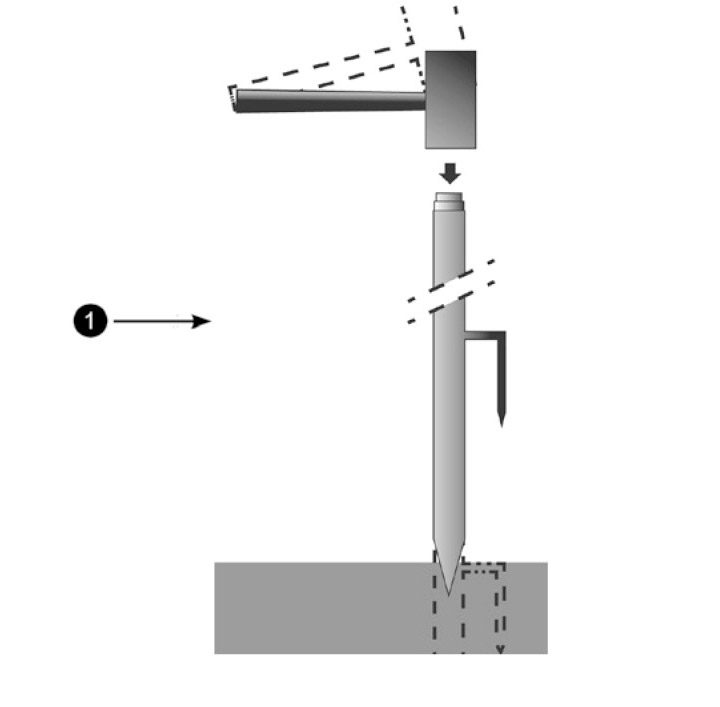
Figure 3: Assembly of the pipe connector into the reinforcement pipe.
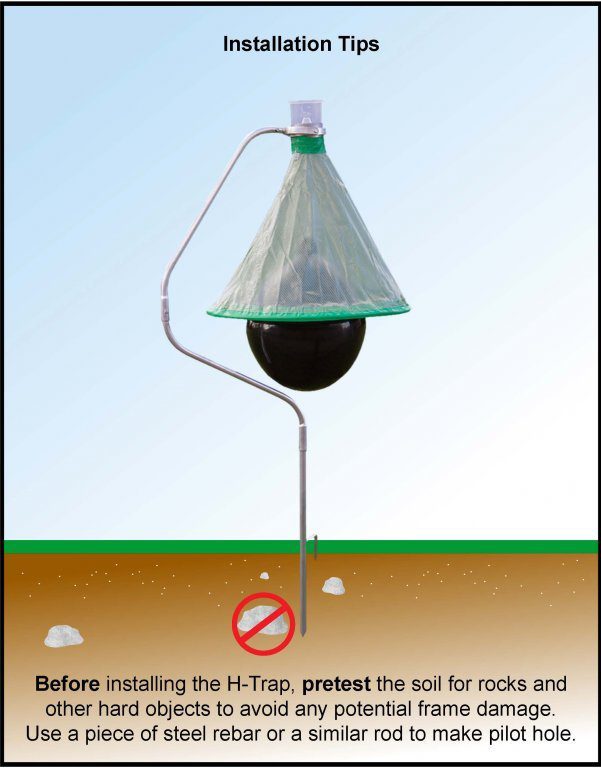
Before hammering the base pipe and anchor pipe (1) into the ground where you have decided to locate your trap, it is important that you pretest the soil. To avoid damaging the base pipe in rocky soils, first use a steel rebar rod or other hard material you have on hand to test the soil to the depth that the base pipe and anchor will go into the soil. Either remove the rocks that you have encountered or use a ground drill with an extended bit the length of the base pipe and anchor that goes in the ground.
Figure 5: Horse Flies (Tabinids) the H-Trap catches
Biting Flies the H-Trap does NOT catch
Bite-Lite® would like to thank you for your H-Trap purchase.
We look forward to hearing from you about your horse fly experience.
Bethel, CT 06801 • 1-855-248-3548 • [email protected]